Table type annotations are used to work with specific sets of information, either creating a non-tabular format from a table, or creating a specific type of table from specific types of information.
Syntax #
t.table.choice
t.table.definitions
t.table.parameters
t.table.properties
t.table.simple
Purpose #
The annotation t.table.choice can be used in a task topic that has a table to illustrate a set of choices that can be made and the result of each choice. This annotations makes a choice table in your input document into a choicetable element in your output.
The annotation t.table.definitions is used to create a definition list from a table containing terms and definitions. These tables are often used for layout purposes only, and best practice is to turn such tables into non-tabular DITA markup. This annotation will remove the table markup automatically and will create the definition terms and definition descriptions from the table contents.
The annotation t.table.parameters is used to create a list of parameters and their definitions. This is a specific type of definition list that is used to describe the parameters in an application programming interface. As with t.table.definitions, this annotation will remove the table markup automatically and will create the parameter terms and parameter descriptions from the table contents.
The annotation t.table.properties is used to display a set of properties for the current topic, and is displayed in a table-like format. The information for a property can include the type, a value, and a description. This is used in reference topics.
The annotation t.table.simple creates simple tables, which are regular in structure and do not need a title or caption. You can designate an existing table to be turned into a simple table with this annotation. If you have text that you want to put into a simple table, please see the simple table help file.
Example: Creating a choice table
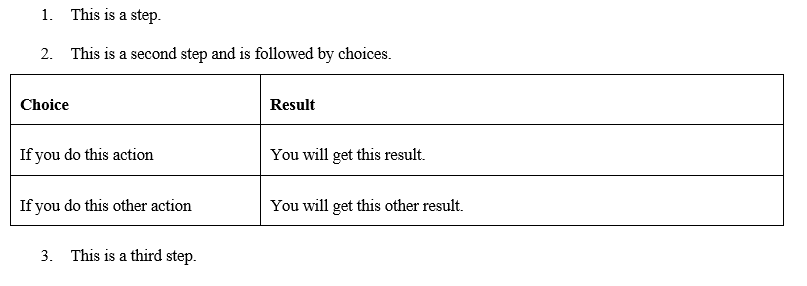
This image illustrates what a choice table may look like in your original input document.
This is an example of how you would create a rule to mark this table as a choice table in the Rules Editor.
This is what your output may look like after conversion.
<steps>
  <step>
    <cmd>This is a step.</cmd>
  </step>
  <step>
    <cmd>This is a second step and is followed by choices.</cmd>
    <choicetable>
      <chrow>
        <choption>
          <p>Choice</p>
        </choption>
        <chdesc>
          <p>Result</p>
        </chdesc>
      </chrow>
      <chrow>
        <choption>
          <p>If you do this action</p>
        </choption>
        <chdesc>
          <p>You will get this result.</p>
        </chdesc>
      </chrow>
      <chrow>
        <choption>
          <p>If you do this other action</p>
        </choption>
        <chdesc>
          <p>You will get this other result.</p>
        </chdesc>
      </chrow>
    </choicetable>
  </step>
  <step>
    <cmd>This is a third step.</cmd>
  </step>
</steps>
Example: Creating a definition list from a table
The following image shows a table that could be converted to a definition list.
This image shows you how to write a rule to create a definition list from a table that contains terms and their definitions.
The following XML shows you what the code of the definition list may look like.
<dl>
  <dlhead>
    <dthd>Term</dthd>
    <ddhd>Definition</ddhd>
  </dlhead>
  <dlentry>
    <dt>IO</dt>
    <dd>
      <p>Input/Output</p>
    </dd>
  </dlentry>
  <dlentry>
    <dt>FIFO</dt>
    <dd>
      <p>First In/First Out</p>
    </dd>
  </dlentry>
  <dlentry>
    <dt>LIFO</dt>
    <dd>
      <p>Last In/First Out</p>
    </dd>
  </dlentry>
</dl>
Example: Creating a parameters list from a table
The following image shows what your table may look like in your original document. This table is actually a definition list, but for demonstration purposes we are using it to demonstrate the parameter table rule also, since a parameter list is simply a specialized definition list.
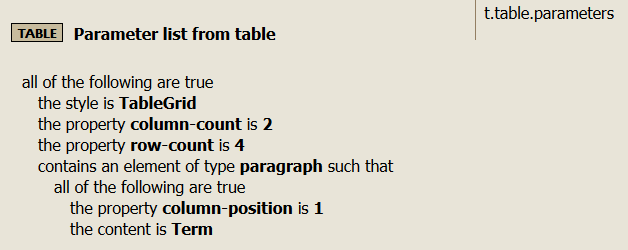
This image displays what your rule may look like to create a parameters table.
The following output is what your parameters table may look like after conversion.
<parml>
  <plentry>
    <pt>Term</pt>
    <pd>Definition</pd>
  </plentry>
  <plentry>
    <pt>IO</pt>
    <pd>Input/Output</pd>
  </plentry>
  <plentry>
    <pt>FIFO</pt>
    <pd>First In/First Out</pd>
  </plentry>
  <plentry>
    <pt>LIFO</pt>
    <pd>Last In/First Out</pd>
  </plentry>
</parml>
Example: Creating a properties table
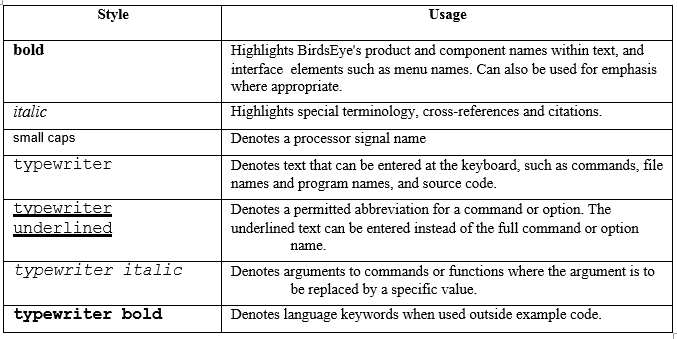
The following image shows what your table may look like in your original document.
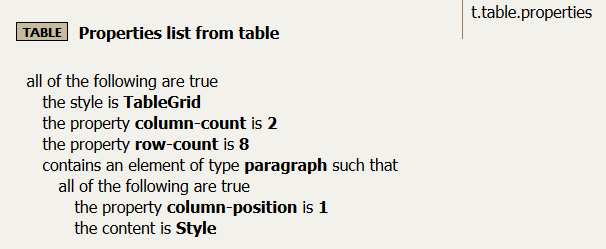
This image displays what your rule may look like to create a properties table.
The following output is what your properties table may look like after conversion.
<properties>
  <property>
    <proptype>Style</proptype>
    <propvalue>Usage</propvalue>
  </property>
  <property>
    <proptype>bold </proptype>
    <propvalue>Highlights BirdsEye's product and component names
               within text, and interface elements such as menu
               names. Can also be used for emphasis where
               appropriate.
    </propvalue>
  </property>
  <property>
    <proptype>italic</proptype>
    <propvalue>Highlights special terminology, cross-references and citations.</propvalue>
  </property>
  <property>
    <proptype>small caps</proptype>
    <propvalue>Denotes a processor signal name</propvalue>
  </property>
  <property>
    <proptype>typewriter</proptype>
    <propvalue>Denotes text that can be entered at the keyboard,
               such as commands, file names and program names,
               and source code.
    </propvalue>
  </property>
  <property>
    <proptype>typewriter underlined</proptype>
    <propvalue>Denotes a permitted abbreviation for a command or
               option. The underlined text can be entered instead
               of the full command or option name.
    </propvalue>
  </property>
  <property>
    <proptype>typewriter italic</proptype>
    <propvalue>Denotes arguments to commands or functions where
               the argument is to be replaced by a specific value.
    </propvalue>
  </property>
  <property>
    <proptype>typewriter bold</proptype>
    <propvalue>Denotes language keywords when used outside
               example code.</propvalue>
  </property>
</properties>
Example: Creating a simple table
The following image displays what your table may look like in your original document.
The following image displays what your rule may look like to create a simple table from an existing table. This is actually a Step-Action table, but for the purposes of demonstration we are using it in this example.
The following output is what your simple table may look like after conversion.
<simpletable>
  <sthead>
    <stentry>
      <p>Step</p>
    </stentry>
    <stentry>
      <p>Action</p>
    </stentry>
    </sthead>
    <strow>
      <stentry>
        <p>1</p>
      </stentry>
      <stentry>
        <p>Check the phase sequence in the mains
           with the phase sequence indicator.
        </p>
      </stentry>
    </strow>
    <strow>
      <stentry>
        <p>2</p>
      </stentry>
      <stentry>
        <p>Check the direction of rotation of
           impeller. If a dry installation is
           made, check the direction of rotation
           through the inlet elbow access cover.
         </p>
       </stentry>
     </strow>
   </simpletable>


